From:https://qiedd.com/1207.html
原创文章,转载请注明出处
https://qiedd.com/
环境为ArchLinux
官方文档:https://github.com/scaleway/scaleway-cli
安装Sacleway-cli
# ArchLinux
yay -S scaleway-cli
# 其他Linux系统
sudo curl -o /usr/local/bin/scw -L “https://github.com/scaleway/scaleway-cli/releases/download/v2.4.0/scw-2.4.0-linux-x86_64”
# Allow executing file as program
sudo chmod +x /usr/local/bin/scw
登录账号并使用API开机
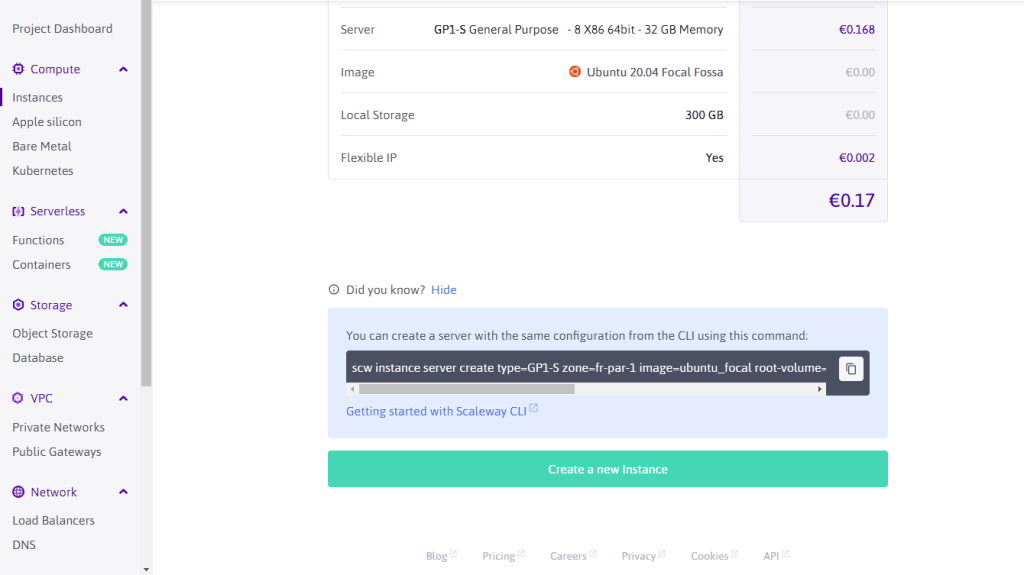
你的账户UUID可以在登录后获取到
或者在创建机器时,在下方的页面,并查看命令行最后的UUID
# 登录账号,获取账号UUID
scw init
# 创建服务器
scw instance server create type=STARDUST1-S zone=fr-par-1 image=debian_bullseye root-volume=l:10G name=Denian ip=none ipv6=true project-id=你的账号UUID
# 查看服务器,获取机器的UUID
scw instance server list
# 开机
scw instance server start 你的机器UUID
开机失败,Starting一段时间后又处于Stopped状态
那么,我们就简单的写一个SHELL脚本来开机,并在开机成功后推送到你的Telegram bot
# 创建文件
vim scw.sh
# 填入你的机器UUID,Telegram_bot_API,以及chat_id
# 给予脚本执行权限
chmod +x scw.sh
# 需要安装screen,创建一个Screen会话
screen -S scw
# 运行脚本
./scw.sh
#!/usr/bin/env bash
MACHINE_UUID=“”
BOT_API=“”
CHAT_ID=“”
STAR_MACHINE() {
scw instance server start “${MACHINE_UUID}”
}
SEND_NOTIFY(){
curl -X POST
-H ‘Content-Type: application/json’
-d ‘{“chat_id”: ‘${CHAT_ID}‘, “text”: “Your Sacleway machine is opening now.”}’
https://api.telegram.org/bot${BOT_API}/sendMessage
}
while true; do
STATUS=$(scw instance server list | sed -n ‘2p’ | awk ‘{print $4}’)
if [[ ${STATUS} == “starting” ]]; then
echo “Your server status is ${STATUS}”
echo “Starting…Wait for 60 seconds to check again…”
sleep 60
elif [[ ${STATUS} == “archived” ]]; then
echo “Your server status is ${STATUS}”
echo “Now we start your machine…”
STAR_MACHINE
sleep 60
else
SEND_NOTIFY
break
fi
done
通过Cloud-init给机器设置密码
由于要上传SSH密钥,很不方便,我们直接用cloud-init设置密码
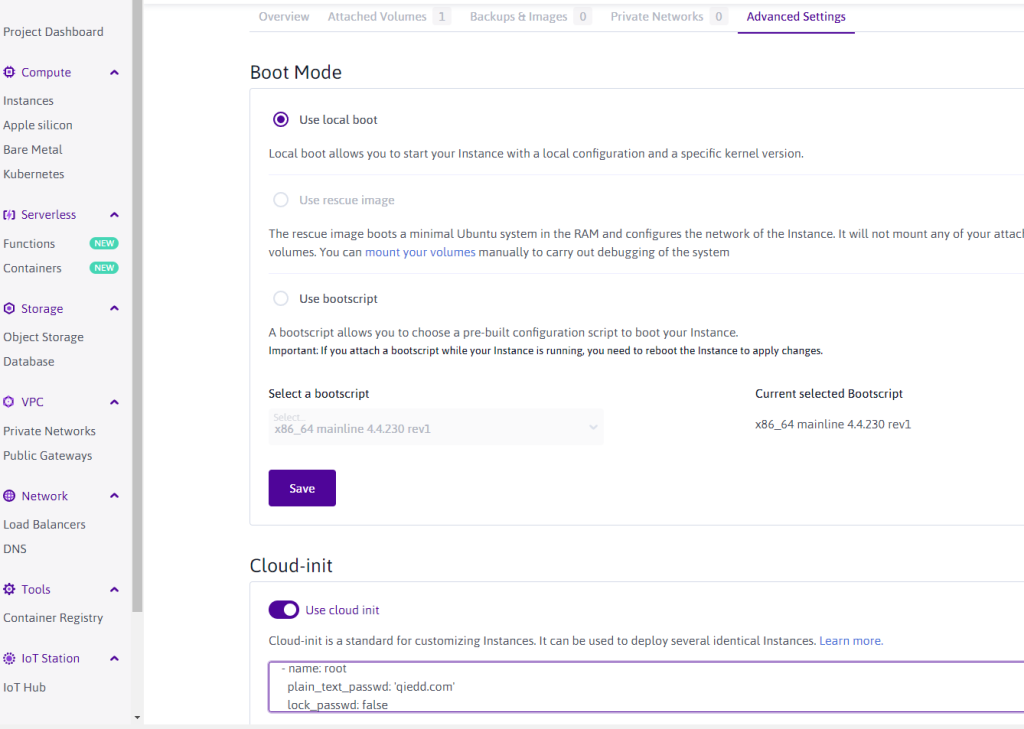
在Cloud-init处添加下列配置即可,密码为 qiedd.com,添加完成后重启服务器即可
users:
– name: root
plain_text_passwd: ‘qiedd.com’
lock_passwd: false
DD成Debian
需要注意 interfaces 里的配置要与安装 Debian 时的 IP 完全相同
如 --ip-addr 240e::ffff::1/64 --ip-gate 240e::ffff::
# 查看网卡配置
cat /etc/network/interfaces.d/50-cloud-init
# 修改本机dns
vim /etc/resolv.conf
# 替换为
nameserver 2001:67c:2b0::4
# 然后按照上面的配置修改你的ip和网关即可
bash <(wget –no-check-certificate -qO- ‘https://raw.githubusercontent.com/MoeClub/Note/master/InstallNET.sh’) -a -d 11 -v 64 -p “qiedd.com” –ip-addr 你的IP –ip-gate 你的网关 –ip-mask 255.255.255.254 –ip-dns 2001:67c:2b0::4
用Warp配置IPv4
# 安装wireguard
apt update -y && apt install wireguard sudo curl vim openresolv -y
# 安装wgcf
curl -fsSL git.io/wgcf.sh | sudo bash
# 注册账户
wgcf register
# 生成配置文件
wgcf generate
# 编辑配置文件
vim wgcf-profile.conf
# 将配置文件的DNS、AllowedIPs、Endpoint,如下
[Interface]
PrivateKey = 这里会自动生成
Address = 172.16.0.2/32
Address = 这里会自动生成
DNS = 8.8.8.8,8.8.4.4,2001:4860:4860::8888,2001:4860:4860::8844
MTU = 1280
[Peer]
PublicKey = bmXOC+F1FxEMF9dyiK2H5/1SUtzH0JuVo51h2wPfgyo=
AllowedIPs = 0.0.0.0/0
Endpoint = [2606:4700:d0::a29f:c001]:2408
# 复制配置文件到wireguard文件夹
cp wgcf-profile.conf /etc/wireguard/wgcf.conf
# 尝试启动 wireguard
wg-quick up wgcf
# 测试
ping google.com -4
# 关闭wgcf接口
wg-quick down wgcf
# 加入开机启动
systemctl start wg-quick@wgcf
systemctl enable wg-quick@wgcf
# 默认v6优先级
# 编辑文件 /etc/gai.conf,将 label 2002::/16 2 的注释删除
测评
测试脚本 yabs.sh
# ## ## ## ## ## ## ## ## ## ## ## ## ## ## ## ## ## #
# Yet-Another-Bench-Script #
# v2021-12-28 #
# https://github.com/masonr/yet-another-bench-script #
# ## ## ## ## ## ## ## ## ## ## ## ## ## ## ## ## ## #
Wed 05 Jan 2022 02:16:13 PM EST
Basic System Information:
———————————
Processor : AMD EPYC 7281 16-Core Processor
CPU cores : 1 @ 2096.060 MHz
AES-NI : ✔ Enabled
VM-x/AMD-V : ✔ Enabled
RAM : 973.1 MiB
Swap : 977.0 MiB
Disk : 8.1 GiB
fio Disk Speed Tests (Mixed R/W 50/50):
———————————
Block Size | 4k (IOPS) | 64k (IOPS)
—— | — —- | —- —-
Read | 151.14 MB/s (37.7k) | 957.71 MB/s (14.9k)
Write | 151.54 MB/s (37.8k) | 962.75 MB/s (15.0k)
Total | 302.68 MB/s (75.6k) | 1.92 GB/s (30.0k)
| |
Block Size | 512k (IOPS) | 1m (IOPS)
—— | — —- | —- —-
Read | 1.18 GB/s (2.3k) | 1.08 GB/s (1.0k)
Write | 1.24 GB/s (2.4k) | 1.15 GB/s (1.1k)
Total | 2.43 GB/s (4.7k) | 2.23 GB/s (2.1k)
iperf3 Network Speed Tests (IPv4):
———————————
Provider | Location (Link) | Send Speed | Recv Speed
| | |
Clouvider | London, UK (10G) | 325 Mbits/sec | 338 Mbits/sec
Online.net | Paris, FR (10G) | busy | busy
WorldStream | The Netherlands (10G) | 325 Mbits/sec | 368 Mbits/sec
WebHorizon | Singapore (400M) | 158 Mbits/sec | 152 Mbits/sec
Clouvider | NYC, NY, US (10G) | 264 Mbits/sec | 255 Mbits/sec
Velocity Online | Tallahassee, FL, US (10G) | 206 Mbits/sec | 269 Mbits/sec
Clouvider | Los Angeles, CA, US (10G) | 213 Mbits/sec | 233 Mbits/sec
Iveloz Telecom | Sao Paulo, BR (2G) | 239 Mbits/sec | 160 Mbits/sec
iperf3 Network Speed Tests (IPv6):
———————————
Provider | Location (Link) | Send Speed | Recv Speed
| | |
Clouvider | London, UK (10G) | 255 Mbits/sec | 5.28 Gbits/sec
Online.net | Paris, FR (10G) | 196 Mbits/sec | 5.37 Gbits/sec
WorldStream | The Netherlands (10G) | 243 Mbits/sec | 5.91 Gbits/sec
WebHorizon | Singapore (400M) | 217 Mbits/sec | 203 Mbits/sec
Clouvider | NYC, NY, US (10G) | 248 Mbits/sec | 2.16 Gbits/sec
Clouvider | Los Angeles, CA, US (10G) | 240 Mbits/sec | 1.10 Gbits/sec
Geekbench 5 Benchmark Test:
———————————
Test | Value
|
Single Core | 660
Multi Core | 662
Full Test | https://browser.geekbench.com/v5/cpu/12004948